الثلاثاء، 13 يناير 2015

تصميم خلفية على برنامج الجيمب بسرعة و بسهولة_ Make abstract background in gimp easy and quickly

This is easy and quick video to make an abstract background in gimp                                                                    
the steps are as following:


1- New layer
2-Make the background back
3- then change the colours of the foreground and background to any colour you like
4-Filter> render<nature<flame<ok
5- You can change the shapes in flame as you like from Edit< randomize

Watch the vedio to show it more clear..

Do not forget to subscribe for more vedios 

bye
_________________________________________________________________


الخطوات كالأتي :

1- أعمل طبقة جديدة New layer
2- غير لون الخلفية للون الأسود
3- بعد ذلك غير الألوان لإى لون تفضله , يمكن تغيره لأزرق فاتح و أزرق غامق
4- من Filters الفلتر اختر render ثم nature ثم لهب flame ثم اختر ok
5- يمكنك تغيير اشكال اللهيب لأى شكل تريد من خلال اختيار Edit ثم Randomize

يمكنك مشاهدة الفيديو للتوضيح أكثر ... لاتنس الأشتراك بالقناة


الاثنين، 8 أبريل 2013

MSNBC Style Effect on Gimp تصميم تأثير جمييل


The original tutorial can be found here
الدرس الأصلي موجود هنا .. http://gimp-tutorials.net/gimp_msnbc_effect/

Step 1


create  new image a 600x450 to fit the width of the site and fill the background to Black

أولا : أذهب إلى file و أختار New Image و أختار width 600 , و Hight 450


Step 2

أختر Bucket fill box من Tool box و أملء الخلفية Background باللون الأسود كما في الصورة


Step 3

Grab the "Blend tool" and set your foreground color to 28188f and background color to black and in the "Tools options" dialog under Gradient select FG to BG (RGB) and shape to Radial.
أختار ( blend tool ) من tool box و أجعل  في الامام اللون 28188f و الخلفية أسود كما في الصورة


 من blend tool في مربع tool options قم بإختيار
Gradient select FG to BG (RGB) and shape to Radial.


step4
Now apply the the gradient from centre to lower bottom corner.
قم بتطبيق ال gradient من الوسط إلى أسفل ركن الصورة

step 5


This is how it should lookو هذا الشكل بعد التطبيق

step 6
Now create a new layer fill it with black then go to Filters>Renders>Clouds>Difference clouds. in the dialog set the following values:

  • -Random: 3
  • -Tick Turbulent option
  • -Detail: 15
  • -X size: 16
  • -Y size: 0.1
    قم بعمل new layer و اجعل لونها اسود ثم اذهب إلى filter و منها اختار Render ثم cloud ثم أختار Difference clouds .

    و من difference clouds اختار :
  • -Random: 3
  • -Tick Turbulent option
  • -Detail: 15
  • -X size: 16
  • -Y size: 0.1

  • ثم اضغط ok


    step 9
    Now will sharpen the image to give it better detail to the lines. go to Filters>Enhance>Sharpen and set
    to 72


    و بعد تطبيقها قم ببعض التعديلات لكى توضح الصورة فقم بالذهاب إلى filter ثم Enhance ثم Sharpen ثم اضبطها على 72


    Step 10

    Create a new layer.
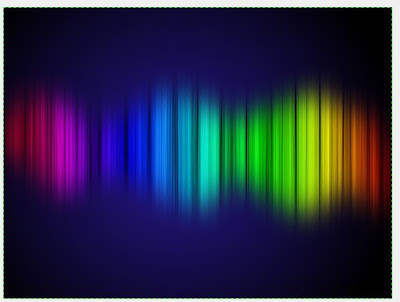
    Now Grab the "Blend Tool" and in the "Tools options" dialog select "Full saturation spectrum CW" as your Gradient and set the shape to Linear and then apply it horizontally.

    اعمل new layer ثم اذهب إلى Blend tool و في مربع " Tool Option " اختار "Full saturation spectrum CW"و غير الشكل " shape " الى  " Linear " و قم بتطبيقها بشكل أفقي .


Step 11

Next change the the Mode to Overlay and then duplicate the layer.

ثم قم بتغير المود Modeإلى  Overly ثم اعمل تكرار Duplicate للـ layer .


Step 12

Now will merge all the layers except the background so unclick the "Eye" icon infront of the "Background layer" then right click>Merge Visible layers.

قف على layer1 المظللة باللون الأصفر و اضغط click يمين ثم اضغط Merge down و اعمل نفس الشئ مع layer 2 قف عليها و اضغط كليك يمين و اعمل Merge dow لتقوم بتجميعهم كلهم عدا الخلفية ..


قم بالضغط على العين بجانب الخلفية لتكون هكذا


Step 13
Grab the "Free Select tool" and draw a wavy selection then go to Select>Feather and set it to 70.

اختار ( Free selection tool )


ثم ارسم اى شكل دائرة مموجة مثلا و قم بعديلها من خلال : أختار Select ثم اختار Feather ثم اختار 70 PX


بعد التعديل


Step 14
Now for the final step. right click on the Rainbow layer with your selection still active and click on "Add Layer mask" and select the Selection option.

الخطوة الأخيرة : اضغط كليك يمين على  layer ثم اختار  " Add Layer mask " ثم اختار  " Selection " كما في الصورة


اختار Select ثم اختار none
ثم اذهب إلى Background و اضغط على العين ليكون الشكل النهائي هكذا


الأربعاء، 6 مارس 2013

رسم شكل كرتونى بالانيك سكيب (Inkscape)


السلام عليكم ورحمة الله وبركاته ، فى هذا الدرس سوف نتعلم رسم شخصية كرتونية
1-ارسم دائرة مع الضغط على زر كنترول لتصبح دائرة مضوبطة وقم بالظغط عليها للتعديل فيها وذلك Path>Object to path
ثم قم بالتعديل فيها وذلك من خلال تحريك المربعات الصغيرة

 وقم بالتعديل فى الالوان من خلال الاداة

وايضا عدل فى لون الاطار
2-ارسم فم بالاداة(bezier curve)

ارسم نقطتين وعدل في المنحنى ليصبح
3- نرسم مستطيل صغير لونه مثل الوان الوجه
وضعه على الوجه واستخدم الاداة
لتصبح فى الخلف


 4-نرسم مستطيل اخر صغير ونضعه تحت وخلف المستطيل فى الخطوة رقم 3


5-نرسم العين برسم دائرة مع الضغط على كنترول 
ونعدل فى الالوان وذلك باستخدام (Radial gradient)


نختار اللونين الابيض واللون الذى فى الصورة
   لكى نزود اللون الابيض فى نصف الدائرة  نختار أولا (edit) ثم يظهر نافذة التعديل نضغط (add stop) هذة تزود عدد المستطيلات الصغيرة البيضاء التى تظهر عند التلوين بلونين (باستخدام الاداتين Linear and Radial Gradient)

6- أرسم دائرة سوداء صغيرة اضعها داخل دائرة العين مع رسم حاجبين بالاداة (bezier curve) 
7-رسم يدين اولا رسم دائرة صغيرة ورسم دوائر اخرى لتمثل الاصابع


نضع الدوائر الصغيرة على الدائرة الكبيرة
ونختارهم كلهم ونضغط على (Ctrl Shift +)
لدمجهم 

8- نرسم ذراع بالاداة (bezier curve)
ثم تلوينها والتعديل عليها 

10- اعمل لها تكرار (كليك يمين +Duplicate) وقلبه بالاداة( flip select object horizontaly)
ثم وضعها فى الناحية الاخرى 

ليصبح الشكل النهائى


أسأل الله التوفيق
نورا